


Have you ever wondered how to place the ham in the ham holder? It is an art that, although it may seem complicated, is essential to enjoy the authentic flavour of ham.
Whether you’re learning how to place a jamón to start slicing at home or you simply want to perfect your technique, this article will guide you through the process.
We will delve into the materials, steps and tips needed to master how to place the ham in the ham holder.
Materials needed to know how to place the jamón in the “jamonero” (ham holder)
Knowing how to place the ham in the ham holder is a skill that requires precision and control, and as with any craft, having the right materials is essential.
Below is a comprehensive and explanatory list of the materials needed to know how to place the ham in the ham holder, how to place the ham in the ham holder and how to place the leg of ham in the ham holder.
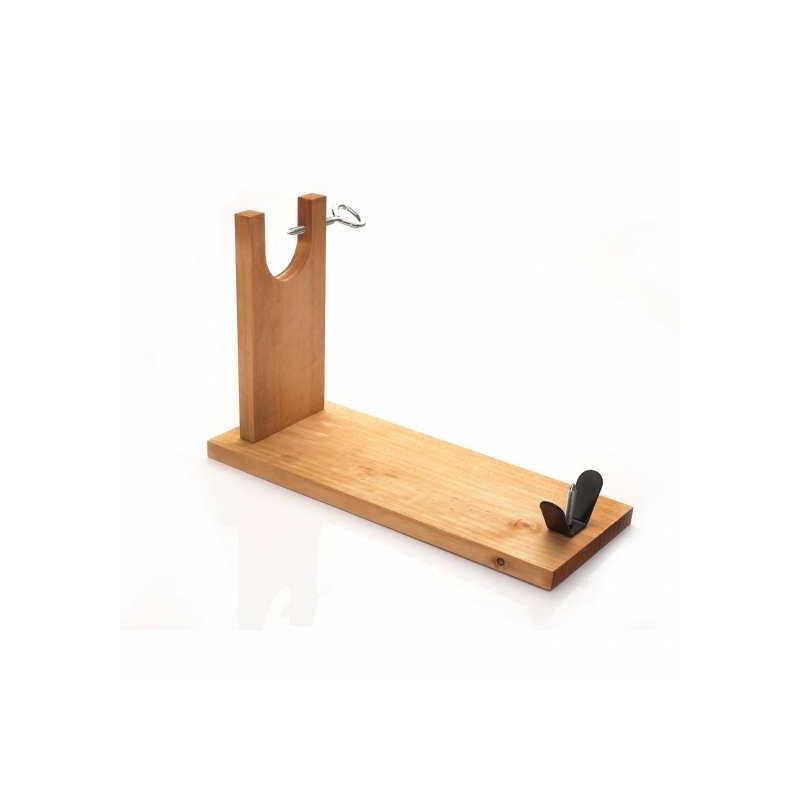
Ham holder
The ham holder is a crucial tool for placing the ham in the ham holder. There are several types:
- Basic: ideal for beginners and suitable for occasional use. They are usually cheaper and offer a basic support.
- Professional: if you are wondering how to place a ham to start slicing at home in a professional way, this type of ham holder is the choice. It has tilt and rotation adjustments to adapt to the shape of the ham.
- With a rotating base: it facilitates the slicing process by allowing the ham to rotate without having to remove it from the stand.
Spanish Ham
Choosing a good ham not only affects the taste, but also how you place the ham to start cutting it:
- Iberian ham: Iberian ham is known for its intense flavour and juicy texture. It should be handled with care due to its delicate meat.
- Serrano ham: Serrano ham is a popular and more affordable option, but still delicious.
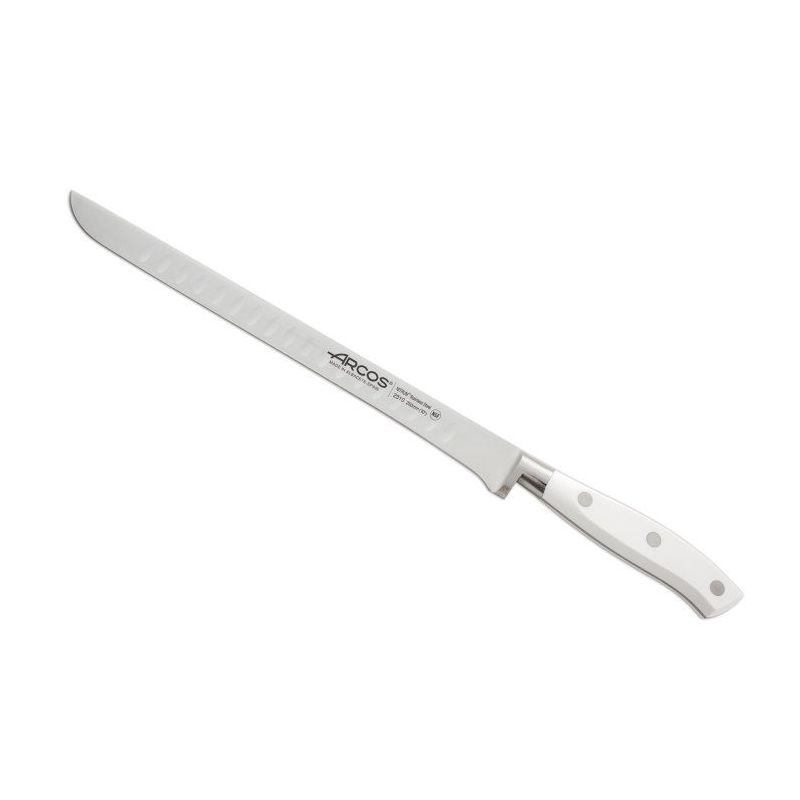
Ham Carving Knives
Knife selection is vital in knowing how to place a ham in the ham holder:
- Ham knife: the ham knife is long and flexible, essential for cutting thin slices.
- Rind knife: shorter and stronger for removing the outer rind and fat.
- Knife sharpener: to keep the knives in perfect condition.
Kitchen cloth or gloves
To maintain hygiene and a better grip when placing the ham in the ham holder. Nitrile gloves are an excellent choice, as they offer a good feel.
Cutting board
Although not strictly necessary, an additional cutting board facilitates the process of cutting the slices and serving them immediately.
Additional accessories
Some additional accessories can make it even easier to place the ham leg in the ham holder:
- Finger guard: to keep your fingers safe while slicing.
- Grease tray: to keep the work area clean.
- Vacuum bags: to properly store any leftover ham.
Steps on how to place the ham in the ham stand
Placing ham in the ham holder is not simply a chore; it is an art that requires attention to detail and careful execution.
For those who are learning how to place a ham to start slicing at home, the following steps offer a complete and detailed guide.
Prepare the ham stand
Before starting, it is essential to ensure that the ham stand is clean and stable on a flat, firm surface.
It is important to adjust the supports and fixings to match the size and shape of the ham.
This ensures that the ham will be secure and will not move during slicing.
Selecting the part to cut
Depending on how the ham is placed in the ham holder, you can start with the meatier part (maza) or the less meaty part (babilla).
The maza has more meat and is usually the preferred option. The babilla, on the other hand, has less meat and more tendons, which makes it a bit more complicated to cut.
Positioning the ham
The position of the ham will determine how you place the ham leg in the ham holder. If you decide to start with the mace, place the leg with the hoof facing upwards. If you choose the stifle, the hoof should be facing down.
Attach the ham
Use the ham holder clamps to secure the ham leg. It should be securely fastened to prevent movement during slicing, but not too tightly so as not to damage the ham.
Remove the outer rind and fat
This step is crucial to know how to position the ham in order to start slicing it properly. Using a shorter, sturdier knife, remove the outer rind and fat to expose the juicy meat. Be sure to leave a thin layer of fat to preserve the meat’s moisture.
Slicing the ham
Now that you know how to place a ham in the ham holder, it’s time to slice. Use the ham knife to cut thin, even slices. Cut towards the bone and then downwards to get perfect slices.
Turn the ham when necessary
As you progress in slicing, it may be necessary to turn the ham. Ham stands with a rotating base make this process easier. If not, you will have to manually readjust the ham in the ham holder.
Store the ham correctly
If you are not going to cut the whole ham in one sitting, it is important to know how to place the ham in the ham holder for storage. Cover the cut areas with the removed fat and a clean cloth to keep it cool.
Cleaning and maintenance
Once finished, clean the ham holder and knives thoroughly. Good maintenance ensures a long life for your tools.
Mastering how to place the ham in the ham holder takes practice and patience. With these detailed steps, you will have a complete understanding of how to place a ham in the ham holder and how to get the most out of this delicious delicacy.
Each step is critical, and following them carefully will ensure a successful and enjoyable slicing experience.
Tips for placing in the ham holder
The task of how to place the ham in the ham holder goes beyond the mechanical steps; it requires attention, skill and care.
Here are some detailed tips to help you perfect the process and understand how to place the ham in the ham holder.
Choose the right ham holder
Depending on your level of experience and frequency of use, your choice of ham holder may vary. Basic models are ideal for beginners or occasional use, while professional models offer more control and precision.
If you are wondering how to place a ham to start slicing at home, invest in a quality ham holder.
Inspect the ham before placing it in the ham holder
Before placing the ham in the ham holder, inspect it for any imperfections or hard areas. This will help you understand how the ham is placed so you can start slicing it more effectively.
Keep knives sharp
A sharp knife makes slicing easier and allows for more even slices. Make sure you sharpen your knives regularly and keep a knife sharpener handy.
Use proper cutting technique
Cutting should be a smooth, continuous motion, not a sawing motion. Practice the correct technique for optimal results.
Control the pressure
When placing the ham in the ham holder and during slicing, pressure should be even but not excessive. Too much pressure can damage the meat and make slicing difficult.
Hygiene and safety
Hygiene is crucial. Wash your hands and wear gloves if necessary. A finger guard can also be useful to avoid accidental cuts.
Cover the ham when not in use.
If you don’t plan to cut the ham all at once, cover the cut areas with the removed fat and a clean cloth to keep it fresh.
Practice and learn
As with any skill, practice is key. The more you practice, the better you will understand how to place a ham in the ham holder and how to get the most out of it.
Enjoy the process
Learning how to place the ham leg in the ham holder is also an enjoyable culinary experience. Enjoy the process and the unique flavour you can offer your guests.
Frequently asked questions on how to place the ham in the ham holder
What type of ham holder should I choose if I am a beginner?
If you are learning how to place a ham to start slicing at home, a basic and stable ham holder will suffice. As you perfect your skills, you might consider investing in a more advanced model.
How do you place the ham in the ham holder to start slicing the meatier part?
To cut the meatier part, known as the maza, place the ham in the ham holder with the hoof facing upwards. This will expose the “maza” and make slicing easier.
How can I keep the ham fresh if I don’t cut it all at once?
To keep the ham fresh after placing the ham in the ham holder, cover the cut areas with the removed fat and a clean cloth. This will help retain moisture and flavour.
Do I need special knives to cut the ham?
Yes, using a ham knife is essential for thin, uniform slices. In addition, a shorter, sturdier knife is useful for removing the rind and outer fat.
How to place the ham leg safely in the ham holder?
The ham leg should be securely fastened in the ham holder’s clamps, but not too tightly so as not to damage the ham. Make sure that the ham holder is on a stable and firm surface before you start slicing.
Is there any risk of cutting oneself when placing the ham in the ham holder?
While cutting yourself is a possibility, following the detailed steps and tips for placing the ham in the ham holder, and using a finger guard and gloves, can minimise this risk.
How can I learn more about how to place a ham in the ham holder?
In addition to this article, there are many videos and tutorials online that offer visual demonstrations. Taking the time to research and practice is key to learning how to effectively place the ham in the ham holder.
What is the best way to clean and maintain the ham holder?
Regular cleaning with warm water and mild soap will help keep the ham holder in good condition. Avoid harsh chemicals that may damage the material.